本以为这两个问题应该人人都懂,但古怪的是我发现应该9成以上的人完全不懂,甚至琢磨出一些玄学。
这里我试着厘清一下。首先,所有资料及测试图片(pattern)均来自lightillusion:https://www.lightspace.lightillusion.com/ 及
calman:https://www.portrait.com/calman-calibration-software/ 公司。我都附上原文及简要翻译。
lightillusion是由柯达及柯尼卡美年达的前员工创业,这两家公司属于业界前二的色彩解决方案公司(题外话:影像业对色彩的要求仅排第五,制药,医疗,陶瓷等行业对于色彩调试的要求非常之高),就我个人看法,lightspace公司的算法精度和稳定性更好,但界面极端不友好。calman公司对于家庭用户更友好,第一个搞了DIP,第一个和LG,Panasonic,SONY搞了交互界面,市场开
拓更好,但是定价更精明,每年的升级能掏干你的荷包。
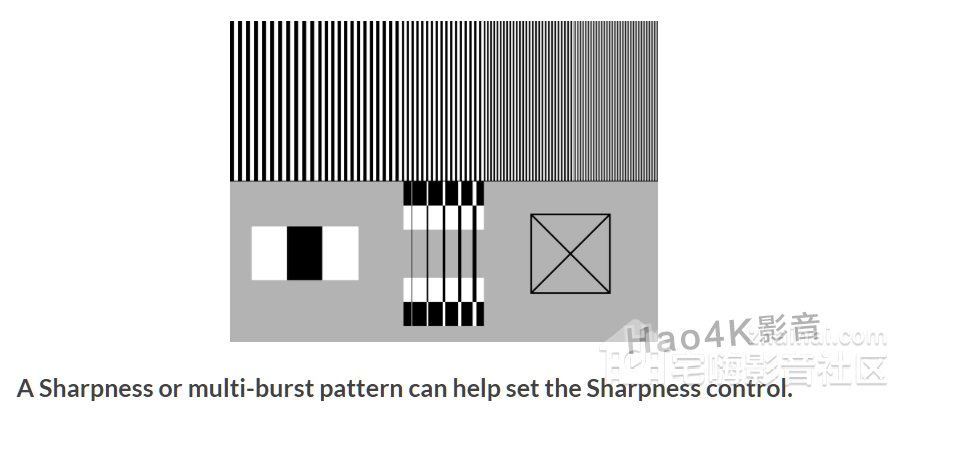
锐度:(Sharpness)
Calman的解释:
Sharpness AdjustThe Sharpness feature in modern displays was originally designed to visually enhance low-resolution source content by enhancing the brightness transitions at the edges of objects in a scene. This edge enhancement creates a thin halo effect at all image edges.
A thin dark halo is added on the bright side of the edge transition line and a thin bright halo is added on the dark side of the edge transition line. These artificial edge halos enhance the visibility of image brightness transitions, creating the visual sense of more detail. Most viewers prefer a perceptually sharp image, but the way that Sharpness works on most displays introduces edge artifacts that are visible as undesired elements of the picture, especially on larger screens. Sharpness enhancement produces an unnatural harshness to the picture, and actually overwrites small, closely spaced image details. When Sharpness is applied to high-resolution images, the picture may appear to be more detailed (edgy) at first viewing, but there is actually less fine detail visible in the picture. It will be seen that cinema pictures, with no edge enhancement, appear to be fairly “soft” images, yet reveal more picture detail than sharpened, edgy video pictures. While Sharpness edge enhancement may benefit lower resolution images on smaller screens, on modern displays with high-resolution picture content, the image artifacts and loss of detail are considered objectionable by most viewers. As a result, conventional wisdom has developed to set the Sharpness control to produce minimum edge enhancement, perhaps at zero. However, some displays may actually soften the image at the lowest settings of their Sharpness control, blurring edge detail. Thus, you need to find the Sharpness setting that neither adds edge enhancement nor blurs the image. This goal may not be perfectly achievable, but the best compromise is usually the lowest Sharpness setting that does not blur image edges. 翻译: 锐度(很多机器的中文菜单叫清晰度)调整 现代显示器中的“清晰度”功能最初旨在通过增强场景中对象边缘的亮度过渡来视觉增强低分辨率源内容。这种边缘增强功能会在所有图像边缘产生较薄的光晕效果。在边缘过渡线的亮侧添加了一个较薄的深色光晕,并在边缘过渡线的暗侧添加了一个较薄的亮光晕。这些人造边缘光环增强了图像亮度过渡的可见性,从而产生了更多细节的视觉效果。 大多数观看者都喜欢感知上清晰的图像,但是“清晰度”在大多数显示器上的工作方式会引入边缘伪像,这些伪像会作为图片的不良元素而可见,尤其是在较大的屏幕上。锐度增强会给图片带来不自然的粗糙感,并实际上会覆盖较小的,间距很小的图像细节。将“清晰度”应用于高分辨率图像时,图片在初次观看时可能显得更细腻(前卫),但实际上在图片中看不到较细的细节。可以看到,没有边缘增强功能的电影院图片看起来是相当“柔和”的图像,但是比锐利的,前卫的视频图片显示更多的图片细节。 尽管锐度边缘增强可能有益于较小屏幕上的较低分辨率图像,但在具有高分辨率图片内容的现代显示器上,大多数观看者认为图像伪影和细节损失令人反感。结果,已经开发出常规知识以将清晰度控制设置为产生最小的边缘增强,也许为零。但是,某些显示实际上可能会在其“清晰度”控件的最低设置下使图像变柔和,从而模糊边缘细节。因此,您需要找到既不增加边缘增强也不模糊图像的清晰度设置。此目标可能无法完美实现,但最好的折衷方案通常是最低的“锐度”设置,该设置不会使图像边缘模糊。 如何调节锐度: To adjust the Sharpness control:- Display a test pattern that has fine detail on a gray background, or display a multiburst pattern.
- Increase the Sharpness control to see the edge enhancement effects around the thin black lines or in the finest detail multiburst bars.Decrease the Sharpness control to minimize the edge enhancement effects, but do not decrease the control below a point that blurs image edges. If edge blurring does not occur, the minimum Sharpness setting is optimum。
翻译:
显示设备的锐度设置调到最高,近处观察屏幕,然后向下降,观察测试图最细线条的边缘,直到开始变模糊的一霎那停止。
测试图示例:

测试图要点:
必须用像素点对点的图:比如物理分辨率4K的电视必须用4K的测试图,1080P同理。来源:请用关键词sharpness adjust pattern自行搜索。
灰阶范围(此处非常乱,英文一般叫gray lever或者video level。中文五花八门,色彩空间,视频范围,AMD显卡叫像素格式,但基本上英文里带着full Range或者limited的就是了)
Calman的解释:
Video Content RangesVideo content is generally displayed in either Full (or PC) range, or Video (or SMPTE, legal). This determines the greyscale range of the displayed content. This article will illustrate the differences.When calibrating displays we are generally working in Video Range levels, which are sometimes referred to as Limited Range, SMPTE Levels, or Legal Levels. These are the levels we anticipate our film, TV and Video content to be displayed in.
Video Levels are defined by their bit values. In a standard 8-bit system (0-255) these levels are from 16-235. When talking about video level patterns that leave the ranges of 0-15 as below black or blacker than black and 236-255 as white/above white.
PC Levels are defined by their bit values, and are also sometimes described as Full Range Levels. In a standard 8-bit system (0-255) these levels are from 0-255. When talking about PC level patterns, the greyscale range will be expanded to completely cover 0-255. This is the default output for most PCs when connected to a PC monitor, but may vary when connected to a video monitor or TV. Brightness and Contrast patterns can be used to determine how your video signal is being displayed, as you will be able to see if content above/below Video Levels is being clipped by your display or other devices in the video pipeline. Lightspace的解释(更详尽) Data vs. TV Legal levelsAll calibration assumes that the entire range of levels are visible - regardless of the workflow being Data or TV Legal range. This means it is imperative the workflow to be used for real work is well understood and the calibration path set-up accordingly. With most DI systems this means understanding how to re-scale the image workflow as required - for example, mapping 0-1023 to 64-940 as required. The needs for understanding this cannot be stressed enough, and more information can be found on the Data vs. TV Levels page. If in doubt ask, and if necessary pay a consultant to check and verify everything before performing any calibration. As a quick guide, if the BarsAndBalck image is clipping at the black patch, and there is no 'surround' on the white patch (and no 'step' in the colour bars), you have an incorrect workflow for calibration. Alternatively, if the Black patch is looking washed-out, and the white patch looking 'grey', there is incorrect scaling being applied, which again is incorrect for calibration. 合并翻译: 内容格式两种:PC(DATA)和video,两种格式采用了不同的灰阶范围,以8bit为例,video的范围是16-235,俗话叫限制范围。那全范围自然超出了,用于PC格式。 针对不同的内容需要选择不同的工作流来实现不同的映射方式。 个人补充:8bit的PC内容是0-255共256阶,2的八次方,英文叫gray level,这也是中文灰阶的来历,代表了数字时代内容可以分成多少级。4K时代的10bit以此类推,一样分为PC和video两种范围。每个人家里设备很多种,根据用途的不同出厂设置不同,比如PC显卡和显示器初始一般是全范围,碟机,电视,投影一般初始是有限范围。MADVR,KODI等软件也有此设置,当不同的播放组合出现,就叫re-mapping(重映射),可能出现了设置错误,也就是我们常说的映射错误。 错误现象请参看上面lightspace的解释:剪切,clipping,灰阶丢了,压缩了........ PC内容电视观看设置正确后的测试图: video内容设置错误被剪切的图: 重映射错误图: 实际操作: 对于绝大部分无法理解上述内容也不想这么累的兄弟们,我的建议是: 碟机看电影,全程选择有限范围。 PC看电影,显卡及电视均选择全范围。应该能杜绝大部分的错误。 如果你还想进一步试试,以KODI为例,暂停个影片,注意,必须是黑夜场景带人脸的,两种模式来回切换,观察人脸明暗过渡层是否不自然。 其他白天场景是根本试不出来的。
写在最后: 本人能力有限,表达不清,力所能及写一点,如有疑问,请自行搜索资料。 本人无意愿参与任何无聊的口舌之争,大神卡位,精神股东等一系列操作。纯粹是对于常识性知识缺乏的骇人听闻程度有感而发而已。 要是有人坚决不同意本人观点,无需您指出,俺改,俺改还不成嘛 ,莫劳您大驾喽。 ,莫劳您大驾喽。
|